
A practical setup for kicking out a lot of decent hero images fast, plus the decisions that mattered more than the tools.
Note: Files for this project are available here: GitHub: n8n-blog-image-pipeline
Here’s one from the “Practical Product Quick Build Toolkit.”
I needed bunch of graphics for content. Here’s how I got solid results quickly and inexpensively.
My focus is on product, not production. But time and money were factors (as always) so this was the fastest way to get things done while leaving a reusable workflow for future needs. There’s a variety of tools for this sort of thing, but I wanted specific direction with general rules. Not just “generate an image,” but a repeatable system that produced a consistent series.
Using a workflow agent tool like n8n coupled with an image-generation model did the trick. I could set images to get generated and then do something else. A few caveats up front: you still have to check the images. Every one. And you won’t own the copyright as you might with commissioned work. But you can kick out what you need fast. Even if you’re only using them as placeholders for a prototype or something, you can replace with better stock or custom work later. For a prototype test that just needs a quick hero image on every page, that trade is worth it. And this will work for a production site as well. But for highest level of quality, professional stock and commissioned work can replace these placeholders. If you’re using a full site AI generator, those will usually be able to make your graphics. But if building with a coding assistant, perhaps not. Here’s a solution for that. Create the graphics in bulk, stage them somewhere with know filenames, (ideally based on direction directly from a coding tool), then load them into your site’s image folder.
Here’s the setup, what it cost, and the rules I’d carry to any similar project. The tooling is the least interesting part. The decisions about what to automate, what to keep human, and where quality actually comes from are the ones worth consideration, whether you’re building this pipeline for one time bulk use or deciding how this AI tool flow fits into your product.
The setup
Four pieces, some of which you may already use:
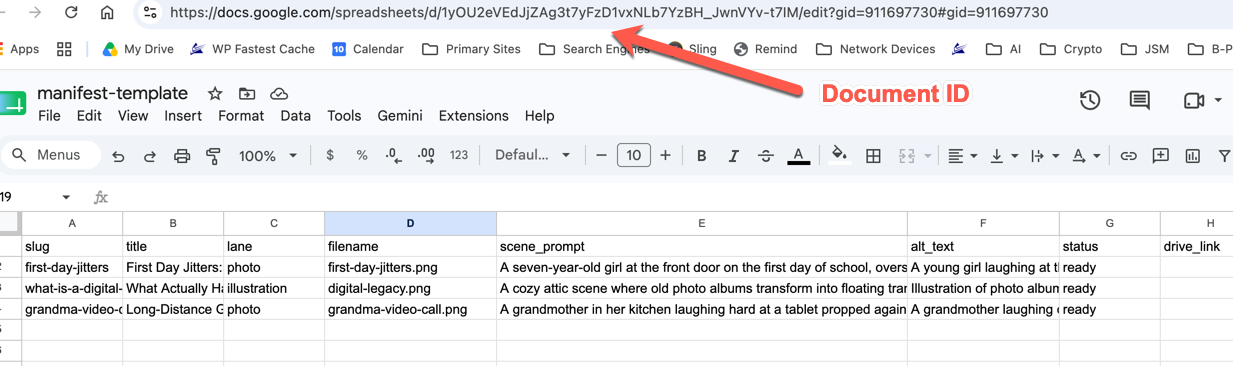
Google Sheet Spreadsheet Manifest: A Google Sheet as the manifest. It’s set up to define one image in each row. Fields include a slug, scene description, output filename, alt text, and a status column. The status column runs the show, marking rows “ready” for the workflow to generate. I mark good output as “approved” manually. Rejects get flipped back to “ready” (with an edited prompt) and only those re-run.
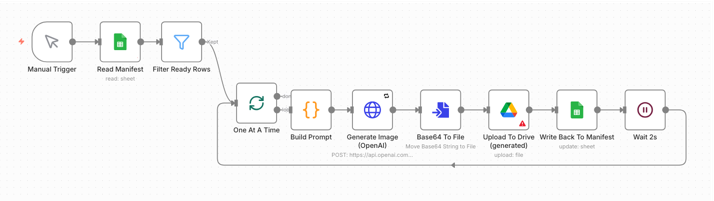
Agentic Workflow Tool: n8n is the agentic workflow in this case. You could use other agentic tools. I happen to already use n8n so that’s the example I’m providing if you want it. You can probably have an LLM convert it to something else if you want, including a raw code script of some sort. The workflow reads the sheet, filters for “ready” rows, processes them one at a time, calls the image API, uploads each result to a Google Drive staging folder, and writes the file link back to the sheet. Trigger it. Walk away, do something else, have some coffee or do a 20 min yoga video. Come back to a folder of images!
API Accessible Image Generator: I used OpenAI’s gpt-image-1, but this part is deliberately swappable. This is a slightly older image generation model, and maybe even already deprecated, but good enough for my needs here and relatively inexpensive on an API cost basis.
The workflow just makes an HTTP request to the image create API. You could point it at whatever model fits your needs and budget. Perhaps test a few candidates in their chat interfaces first with identical prompts, and also judge them on series consistency, not single-image quality. In my testing, some models held a coherent look across a batch while others drifted into different styles within four images. A model that makes one amazing image but can’t hold a style is the wrong model for this job. Also, API output can differ from chat-UI output for the same model, so run a pilot test with 5 images through the actual pipeline before committing to a full batch. This habit generalizes beyond images. Before spending a lot of time and money on batch jobs, test the assumption that’s cheapest to check and most expensive to be wrong about.
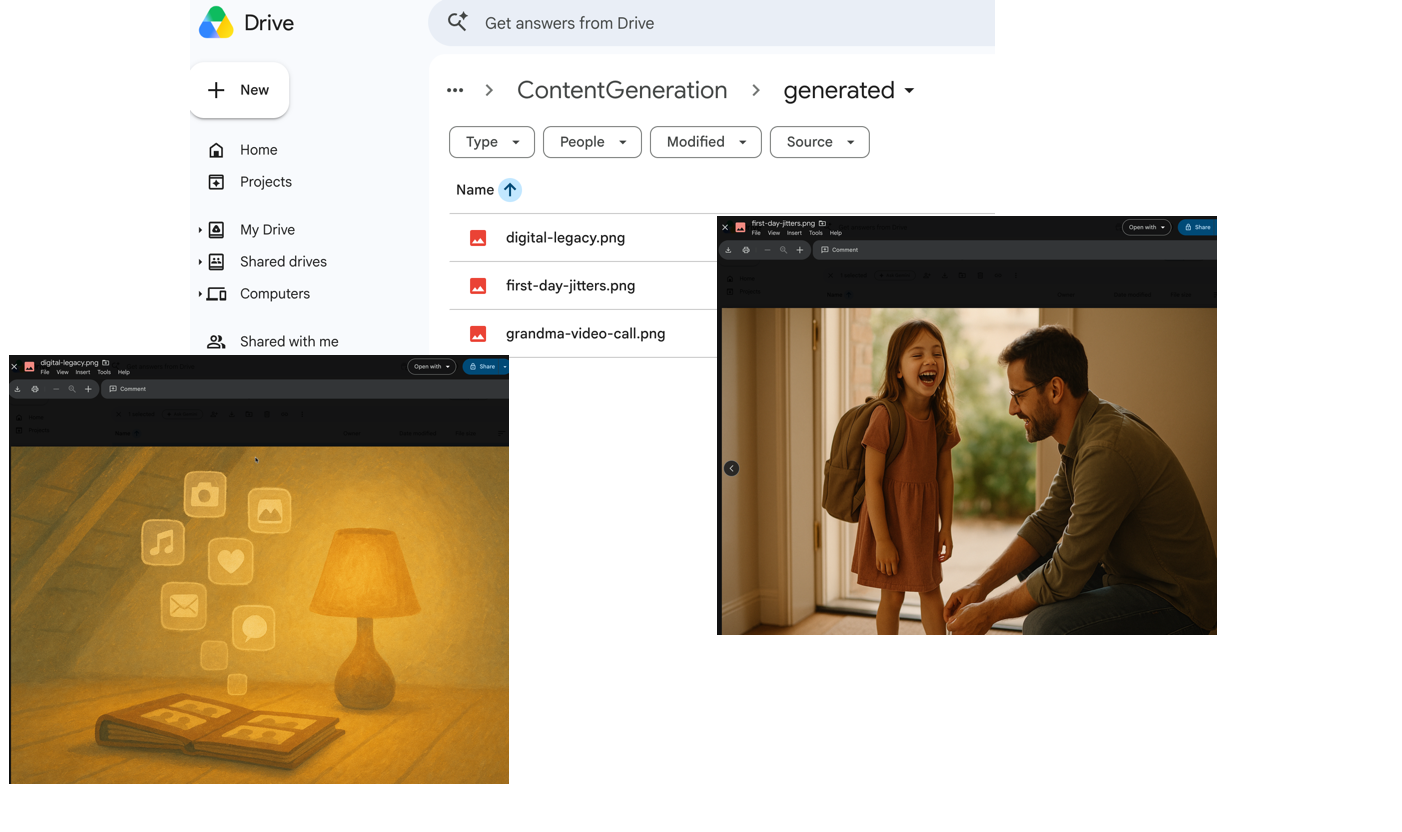
Human Review Gate: Everything lands in a staging folder. Nothing touches a production website automatically. I move approved images over by hand. This is a feature, not a bug. So you’d get your images in the “/generated” folder and manually move them to “/approved”. You can change this workflow of course. However, I believe this is a correct spot for a Human In the Loop check. It’s an inexpensive place to make modifications, manually replace a graphic if necessary, change a filename, and so on.
The rules that made it work
1. Consistency comes from palette and mood, not one uniform style. My first instinct was to force a single style on everything. But this was a mistake and didn’t work out that well. Output was “ok” but too similar to the point of being sterile. For this case, some posts are human stories that want photographs, others are abstract concepts that look absurd as photos. The fix was a two-lane system: a “lane” column on each row picks either a photorealistic style or a warm illustration style. Both lanes share the same color palette, light, and mood, so the series still reads as one brand. You might want to add another lane for infographics or something else.
2. Single-source your style language. Each lane’s style description lives in exactly one place. A small code step that appends it identically to every request. Per-image direction stays in the spreadsheet row. The ideal result is zero prompt drift across the whole series, which is the thing that can ruin hand-generated batches over time. Just be warned that there may be some concerns about scale. This prompt-only approach holds well across dozens of images, but if you’re generating hundreds, look into reference-image conditioning or trained styles. (That’s just overkill for a quick prototype or small effort.) You may have a design system, branding guidelines, style guides and so on. This project isn’t using those. But it could. If you need such a thing, those aspects are likely part of a larger product’s document repository someplace. You would need to add them as background into the image generator’s system prompts.
3. The prompts are the policy. My most useful lesson: Between my worst batch and my best batch, nothing in the workflow changed; not the model, not the settings. Only the words. Early prompts avoided showing faces, and the results were technically perfect and completely lifeless. Rewriting every people-scene to name who’s in frame and direct the actual emotion (“mid-laugh,” “first-day grin”) transformed the output. If your generated images feel dead, fix your sentences before you messing around with your configuration.
4. Review is non-negotiable. (For me.) Roughly speaking the generation is cheap, the mistakes are cheap, but a bad image published on your project might not be. The staging-folder-plus-approval loop costs minutes and catches everything from weird hands output, (like wrong number of fingers), to off-brand vibes to maybe something worse. If you’re wrestling with where humans belong in AI workflows more broadly, this is my answer. Automate the dull repetitive production tasks, but continue to understand were judgement is needed and keep those judgment portions. Don’t sleepwalk through things just because maybe you sometimes can now. Make the gate structural to force the task on yourself if you have to. Use separate folders the automation can’t cross rather than a policy someone has to remember to follow. Regenerating a reject costs cents, if anything if you’re within a plan’s limits. And if you’re at some GPT usage window limit? You can run it some other time or change the run trigger to be at a particular time, such as overnight.
The numbers
- ~20–40 seconds per image at 1536×1024, high quality
- A 28-image batch: about 12–17 minutes, unattended
- Total cost for the full batch: Depends on your tool, but only a few dollars for this. Could be less if using something within a free plan.
- Regenerating any single reject: another minute or so and either free or a few pennies.
The snags (so you can avoid them)
Setup was not frictionless. Once again, this is the part so many of the Happy Path YouTube videos and LinkedIn posts don’t talk about. There’s frequently hassles just setting up initial tooling. Once that’s done, things often run well enough. But there’s frequently bumps. Here are some of them. If you hit others, of course, do the usual… prompt your way out of them.
The complete list is in the repo README, but here’s the highlights. API access to the image model can be blocked by three separate account-level settings (organization verification, a project model allowlist, and keys created before verification) You may need to go to your AI/GPT provider’s platform site and adjust permissions, possibly add billing if you haven’t done so already, or just add funds to your account.
If it’s the image generation node that keeps failing, and you’re just getting stuck and can’t figure out why it’s not working, try minting a fresh API key to use in your n8n credential. On rare occasion, n8n can just get stuck a simple refresh on the workflow page unsticks it. This is sometimes why if you’re going crazy thinking you did something wrong, but can’t figure out the issue, maybe it’s not really you. It’s ridiculous, but just like every so often the cell phone fix is just to reboot it, here too sometimes just restarting something works. Google OAuth tokens might also expire weekly if a self-hosted consent screen is left in “Testing.” And n8n has a couple of quiet traps. Swapping spreadsheets might wipe a column mapping, and a pasted expression in the wrong field mode sends literal braces instead of values. (If this sounds like nonsense talk to you, it’ll be clear enough if you do this and open up the workflow nodes in n8n. Then you’ll see the field values.) So if you start a new spreadsheet for a new batch, remember to open the nodes in n8n again, (specifically, the write to spreadsheet), and check for column mapping resets. Which means double-check the Google write node to make sure the correct column mappings are there. (They’re shown in the sticky note on the workflow if you need to replace them.) Yes, you can re-use the same sheet, but archiving the old sheet and starting fresh keeps things tidier than reusing one forever.
Watch for the simple things: Make sure you copy the Google Sheets document ID correctly. Don’t forget to also get the ID of the folder where your images are going to go and update that node in the workflow with that info.
Wrapping Up
This isn’t a replacement for real photography or custom illustration, and I don’t pretend the outputs are that. It’s a fast, cheap, consistent baseline. Every post of content that needs a graphic can ship with an on-brand hero image, and any of them can be upgraded to stock or custom work later without touching the system. The automation is the easy part. It’s an afternoon. Or less since you have the templates now. The style decisions and prompt-writing are where the real time goes, (or should be), and they’re also what makes the output worth using.
One more thought if you manage products rather than pipelines. Here’s the decisions… The transferable part of this project isn’t the tooling. It’s the types of decisions. Pilot small before you spend. Keep judgment human and make the gate structural. Ship a good-enough baseline you can upgrade later without rearchitecting. And when AI output disappoints, interrogate the spec before the system. My worst batch and my best batch ran on identical infrastructure, and only the words changed. That last one is the lesson I’d take into any AI feature discussion.
The sanitized n8n workflow, a manifest template, and the troubleshooting list are on GitHub: n8n-blog-image-pipeline.